Sale Shipment Records and Tracking Information Emails
Sale Shipment Records and Automated Emails. View Email Recipients for Shipment Tracking View Tracking Information for Shipped Orders Sale Shipments Navigation Select Sale Shipment Email Recipients Se…
Sale Shipment Records and Automated Emails
View Email Recipients for Shipment Tracking
View Tracking Information for Shipped Orders
Select Sale Shipment Email Recipients
Setting Up a Parent Customer to Receive Emails for Smaller Subsidiaries
Outside Rep Sale Shipment Notifications
Setting Up the Same Shipment Email System
Finding the Data Fields Available for Email content
Sale Shipment Records and Automated Shipment Emails feature ensures that customers are promptly and efficiently informed about the status of their shipments. This guide provides an overview of viewing shipment tracking information, entering shipment tracking information, and customizing notifications to keep customers in the loop.
Overview
Customers with a Wheelhouse account who are connected to an order will automatically receive sale shipment emails by default, ensuring they are always up-to-date with their order's shipping status. Those who prefer not to receive these updates have the option to opt-out. Additionally, email addresses may be added to receive sale shipment emails.
View Email Recipients for Shipment Tracking
Email Addresses Added in Order Management: Email addresses manually added to the order will be included in the shipment notification list. Email addresses may be added when the order is at the quote stage and will propagate to the sale. Recipients may also be added to the sale.
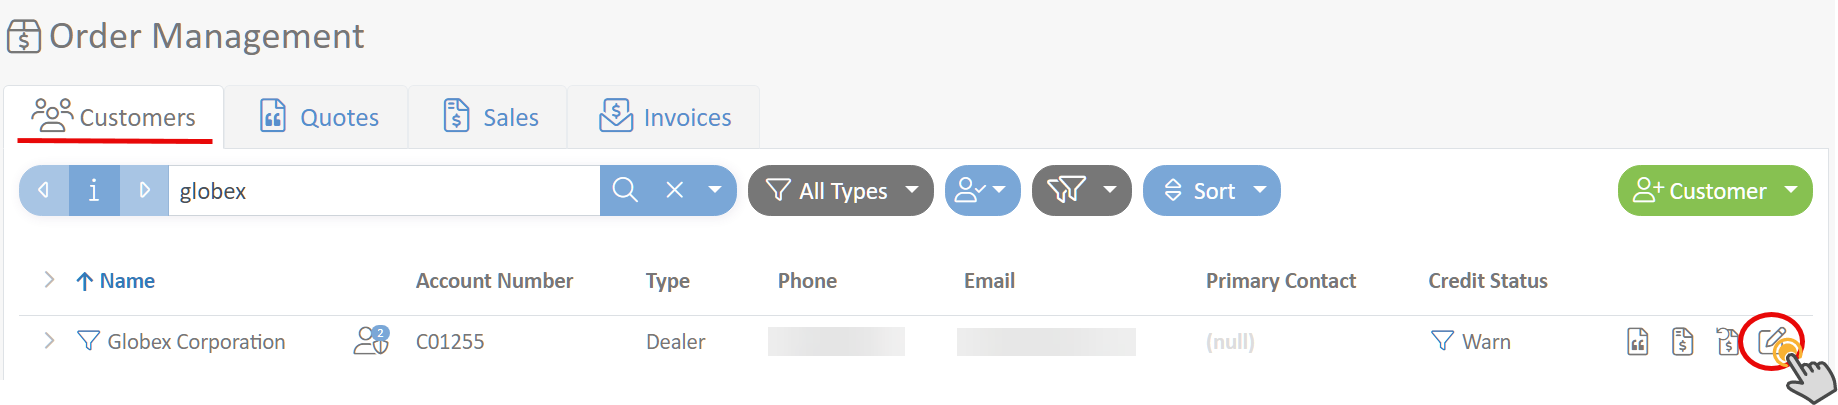
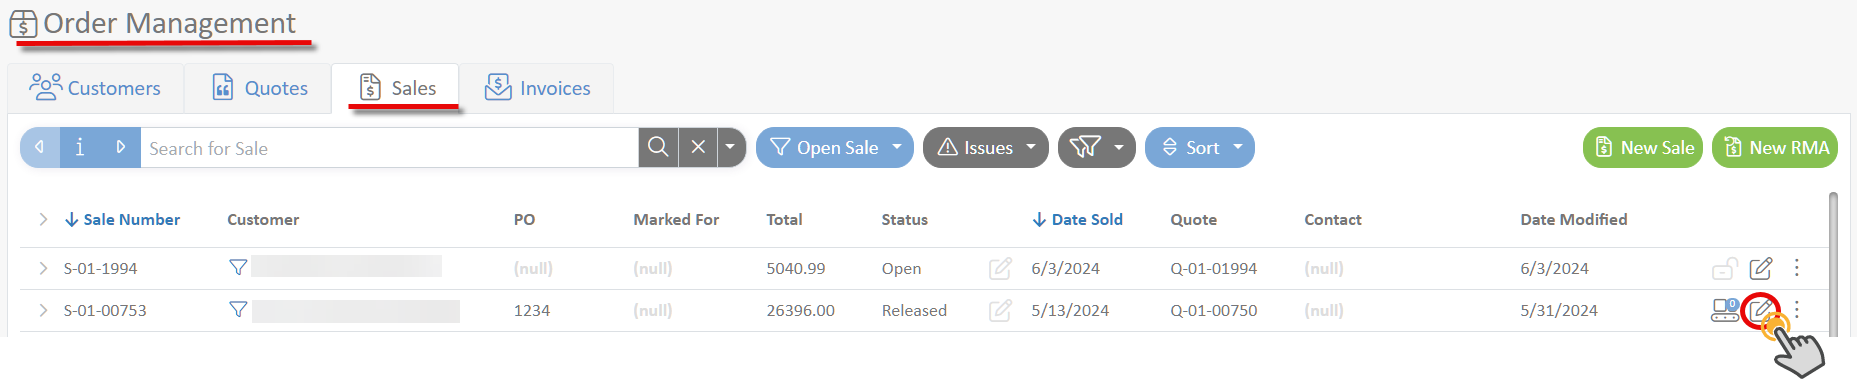
- Navigate to Order Management -> Sales tab -> click the Edit sale button
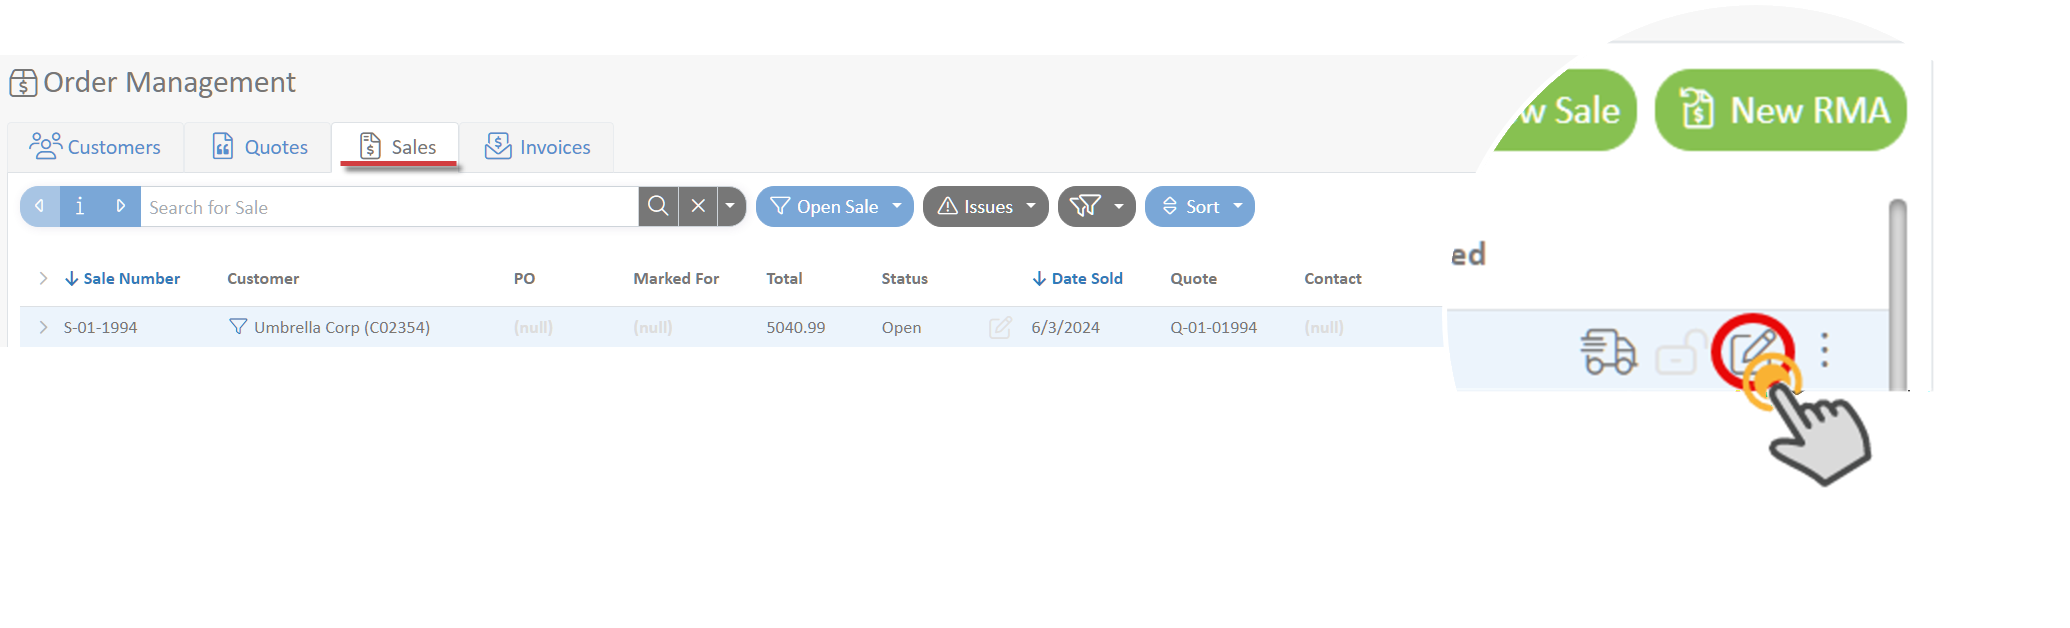
- Select the shipping truck icon in the order toolbar to view all recipients for the shipment tracking emails.
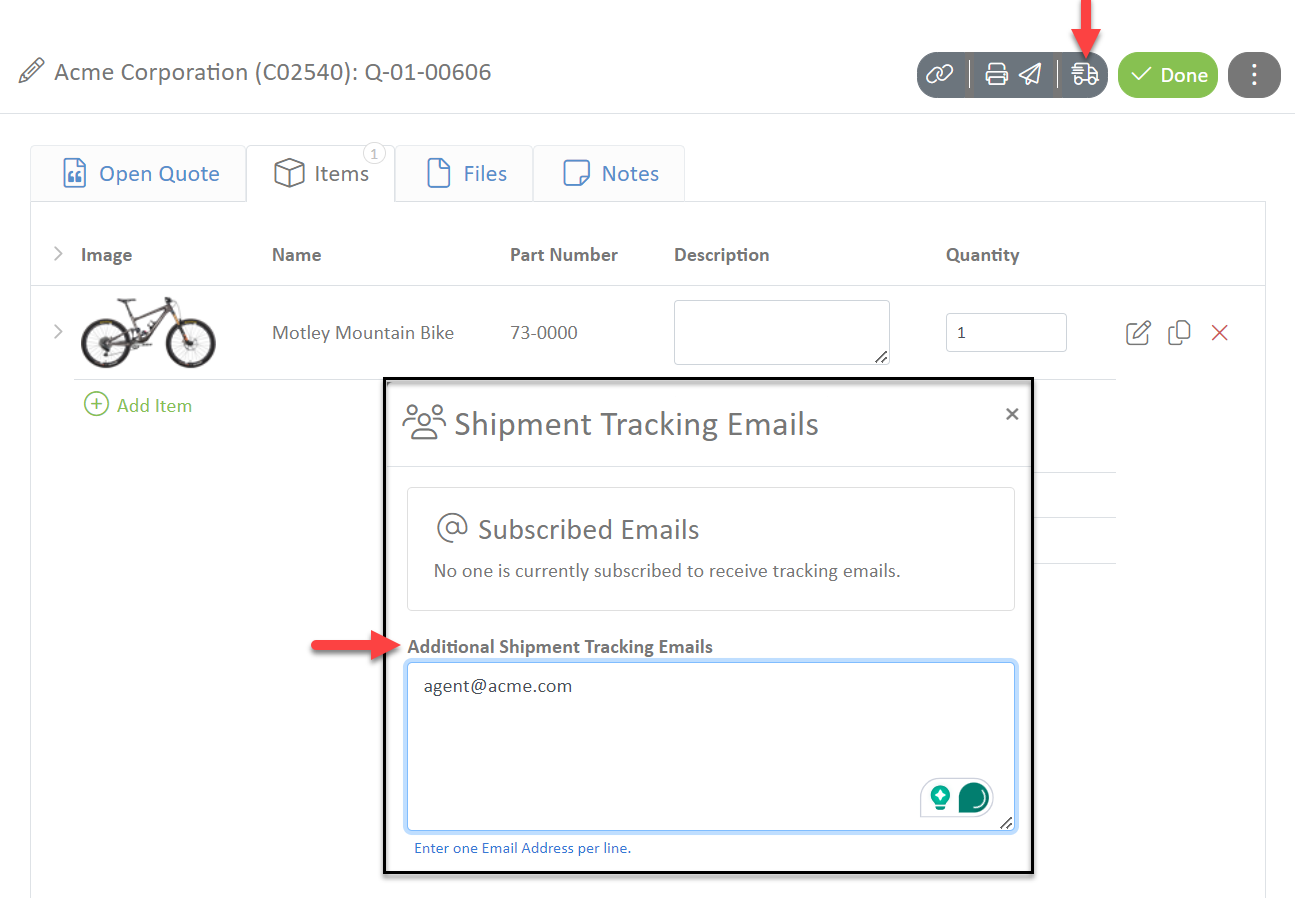
Additional Emails Added During Sale Shipment Creation: This allows for last-minute additions to the recipient list.
View Tracking Information for Shipped Orders
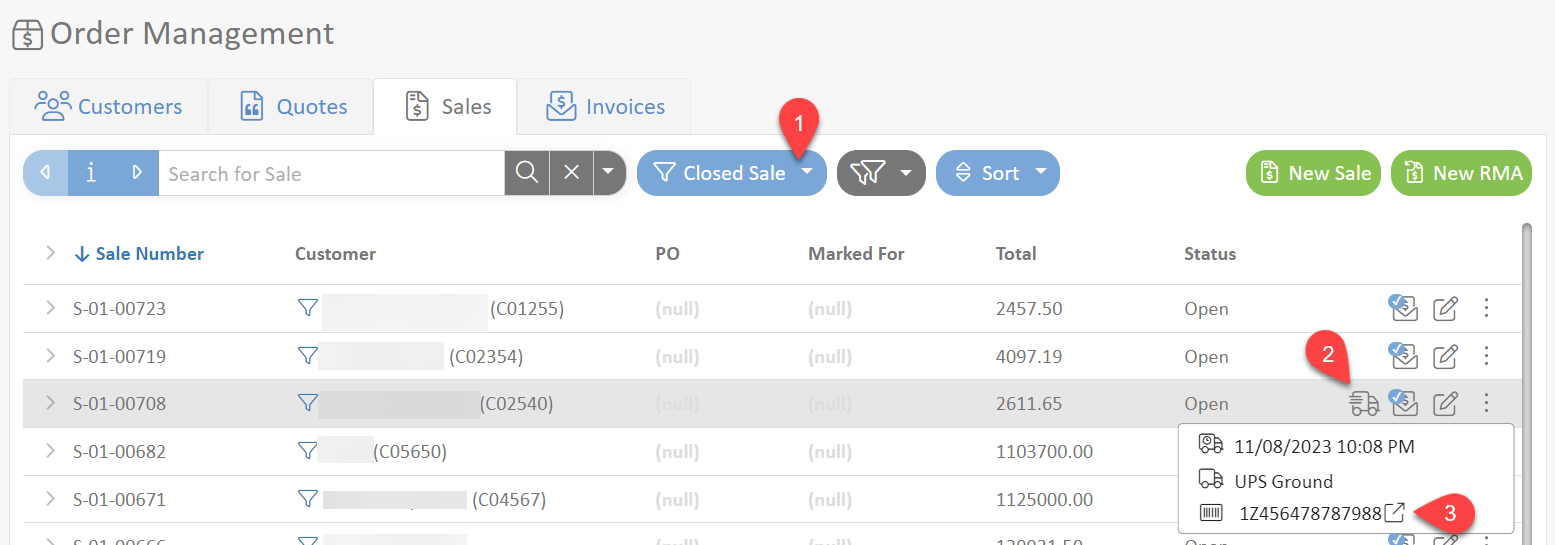
Tracking information is available to logged-in users through the shipping truck icon when tracking information is available. Since sales are typically closed and invoiced, the tracking information is usually connected to closed sales and invoices.
- In the left menu, navigate to the Order Management -> Sales tab and switch the filter to Closed Sales. Customers with access to the Invoices tab will also see shipment tracking information displayed.
- Select the Shipping Truck Icon on a sale.
- Select the external link icon to open the shipper's tracking page, if available.
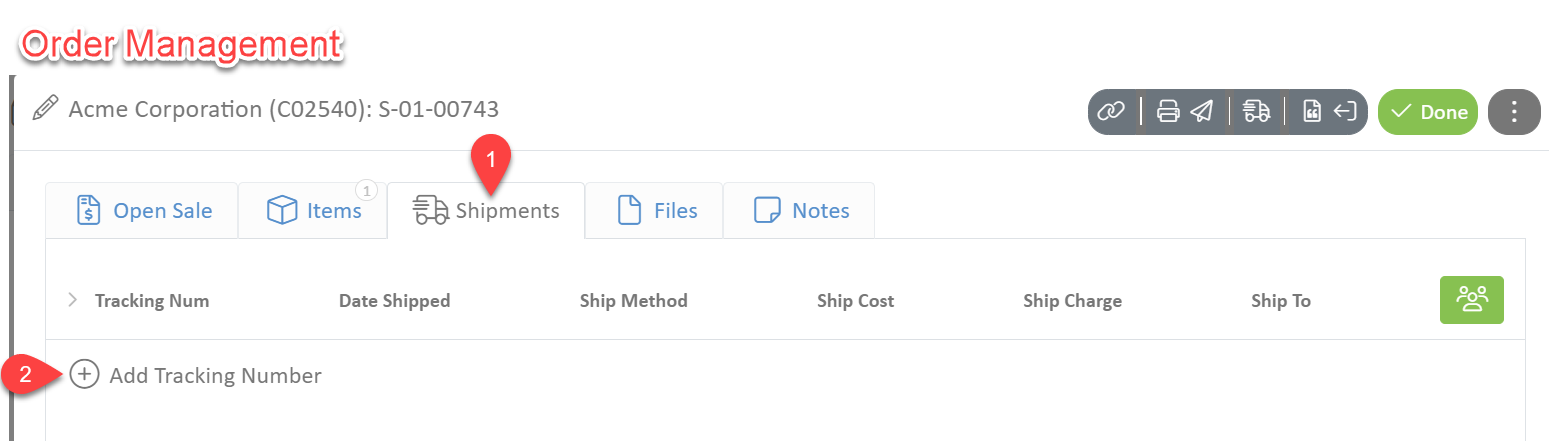
- To view more details about the shipment for an order, click the edit button or double-click a sale and navigate to the Shipments tab.
Sale Shipments Navigation
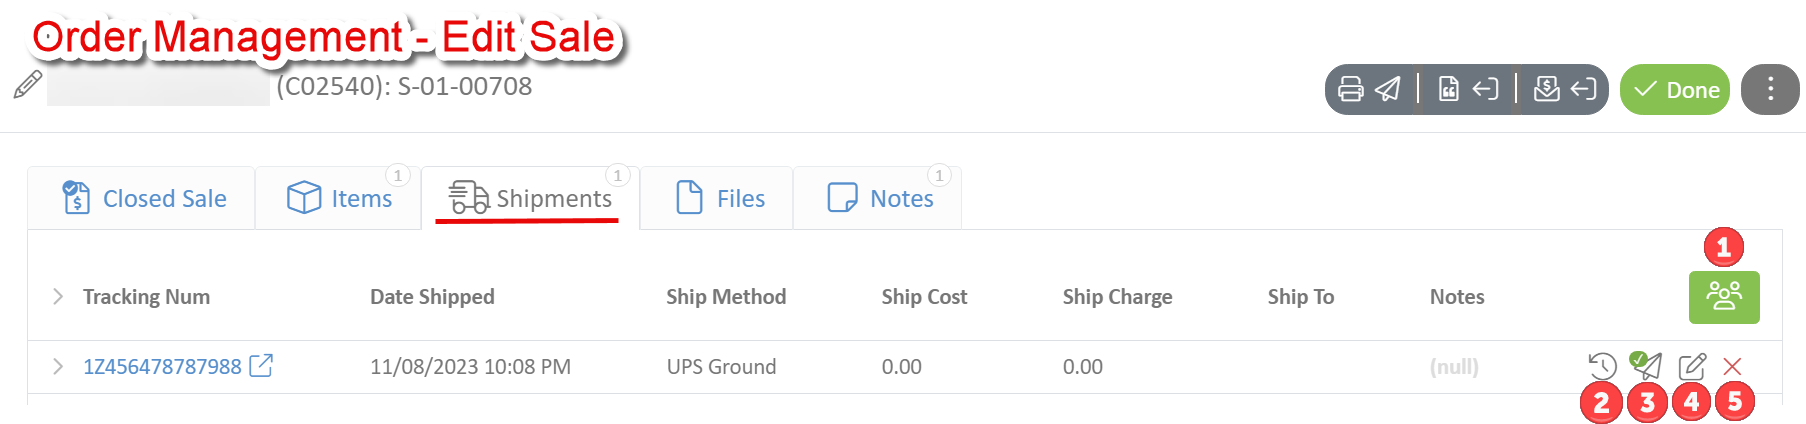
Navigate to Order Management -> Sales tab -> select the Edit button for a customer -> Shipments tab.
- shipment emails: Edit subscribed emails
- Email Tracking History: Returns a list of all emails sent for the sale
- Email Tracking Information: View and edit the email options for the sale. A green checkmark represents a successful email, click to see more details.
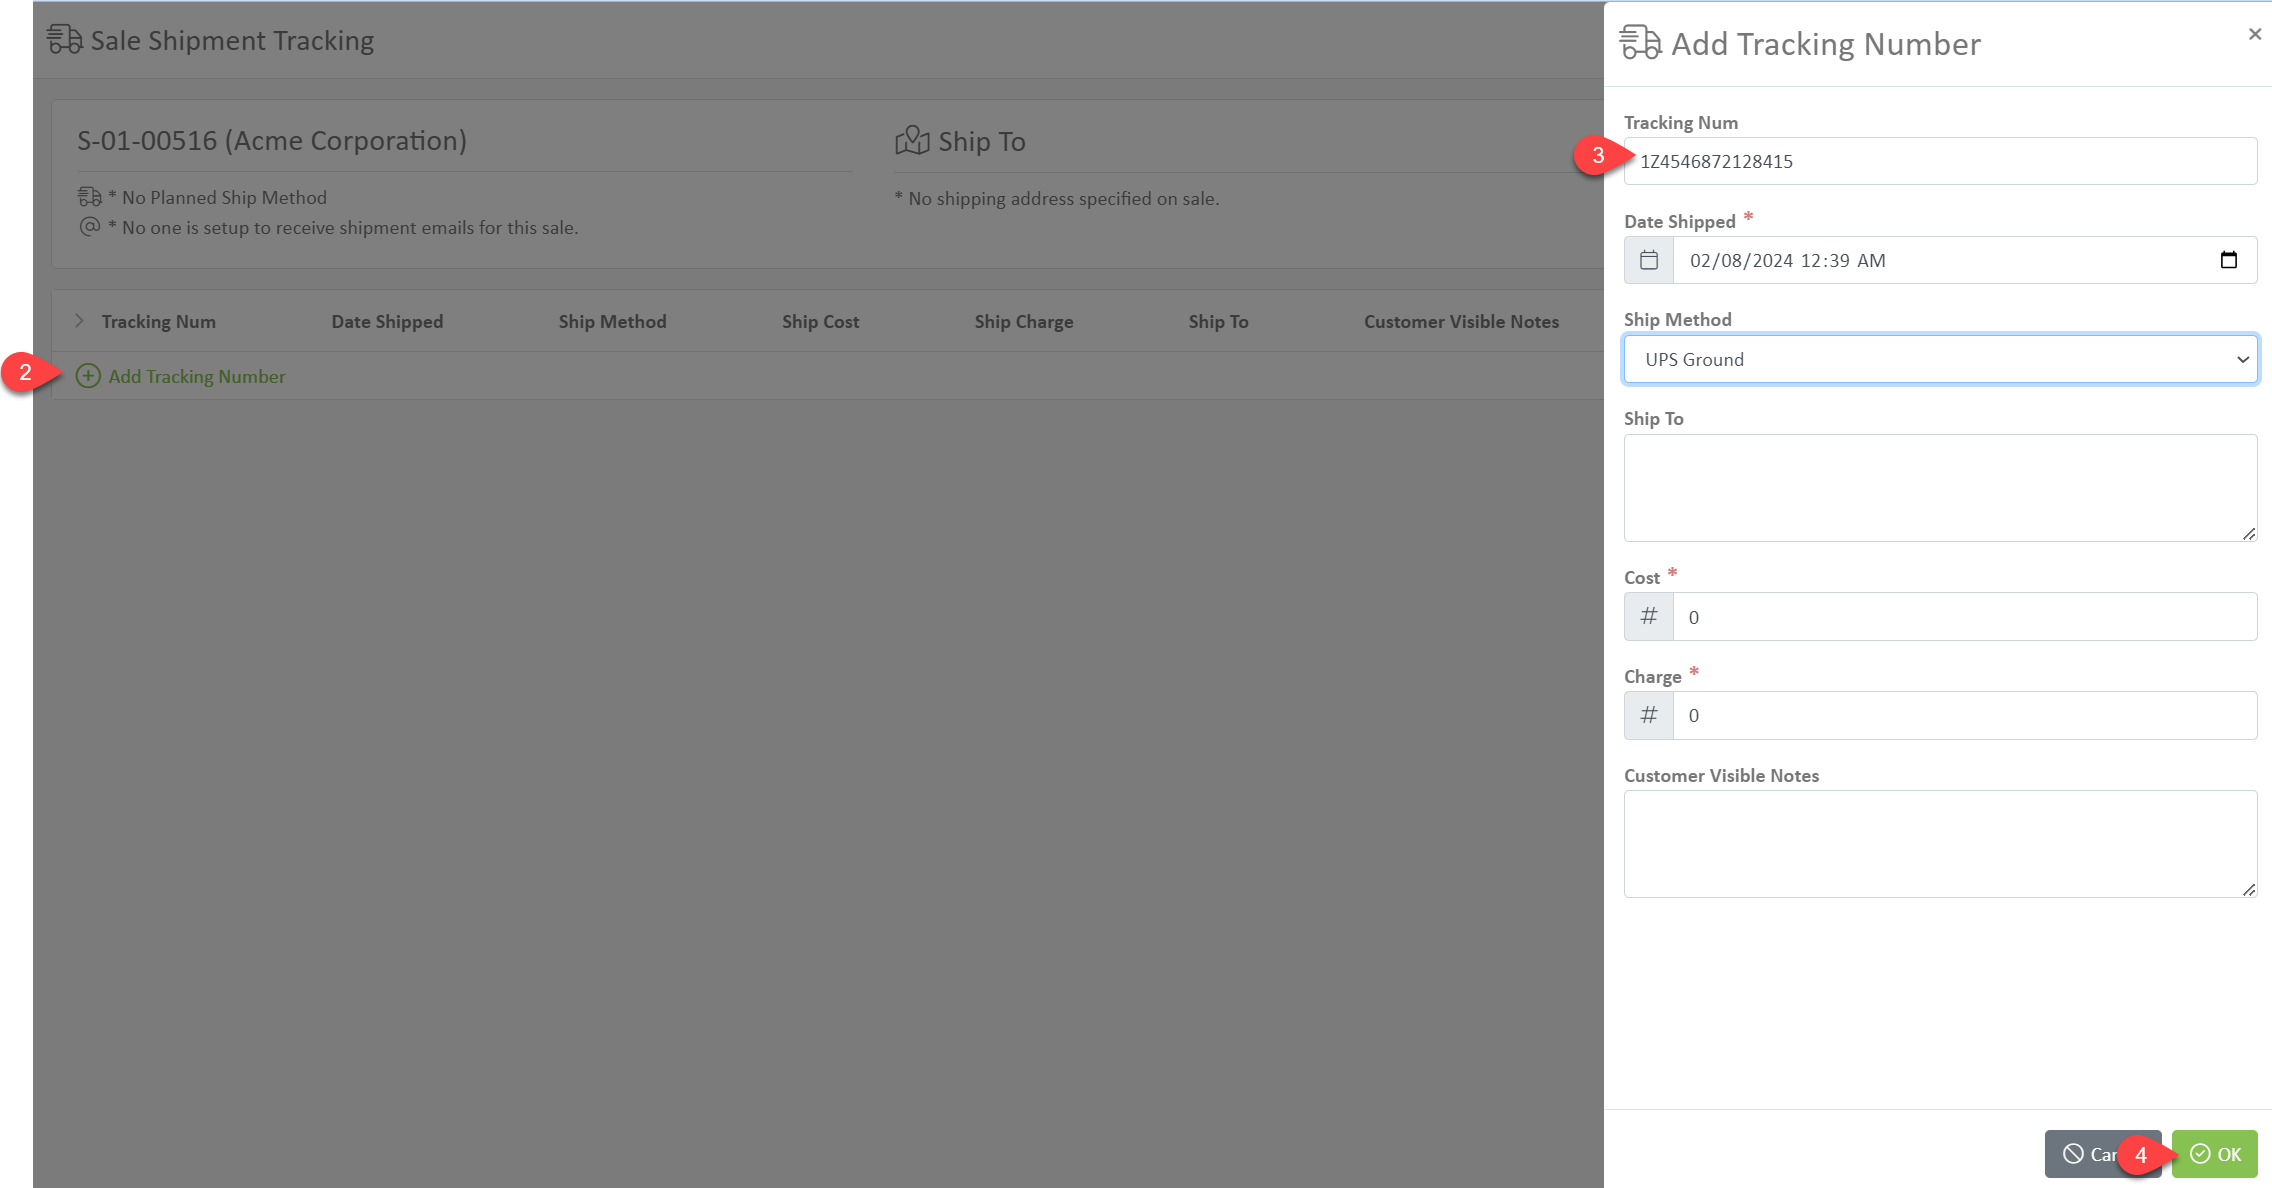
- Edit Shipment: Edit the tracking information such as the tracking number, shipping method, cost, charge, and associated notes.
- Delete Record: Deletes the shipment record.
Sale Shipment Email Recipients
Sale Shipment emails are sent using the following criteria:
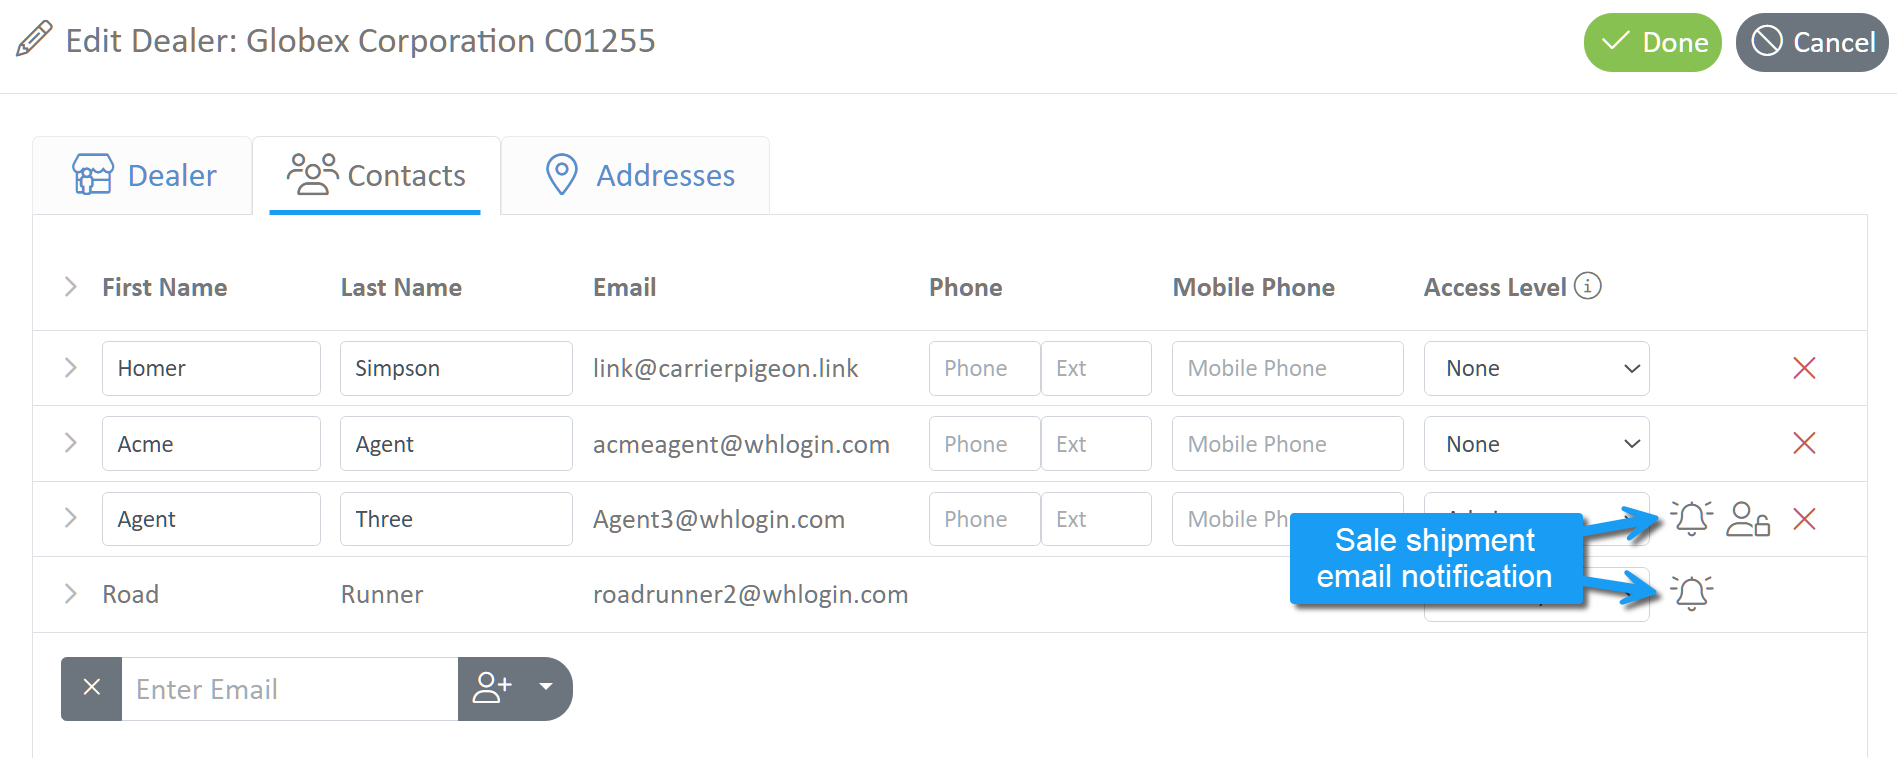
Users with Wheelhouse Logins and Sale Shipment Emails Enabled will receive emails for orders they are connected with. Standard, Admin, and Read Only users have the option to receive sale shipment emails for all shipments to the customer. New logins have sale shipment emails enabled by default.
- Navigate to Order Management ->Customers tab -> select the Edit button for a dealer/customer -> Contacts tab.
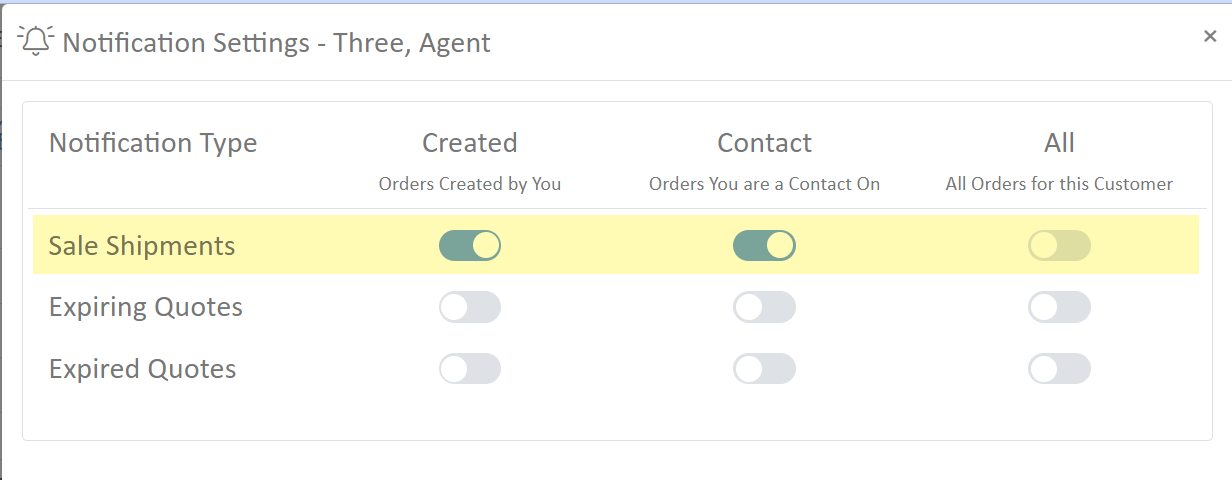
- A notification bell indicates that the user has the option to receive sale shipment emails. Select the bell to see the notification settings.
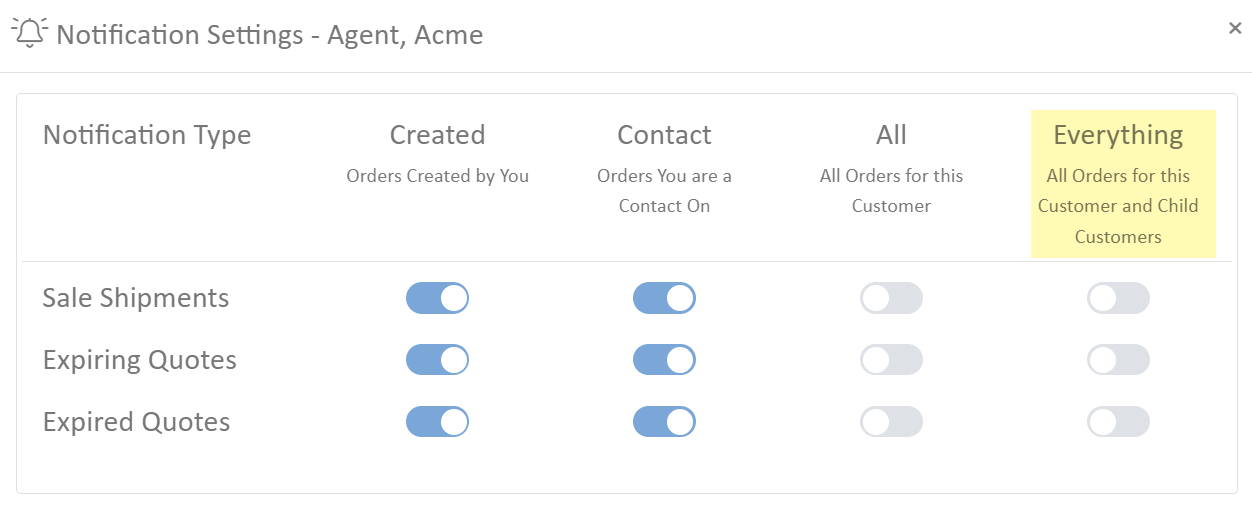
Setting Up a Parent Customer to Receive Emails for Smaller Subsidiaries
This feature is particularly beneficial for organizations where a central purchasing or accounting department oversees multiple subsidiaries. By enabling this option, users with access to the parent account can receive shipment notifications for all related subsidiary transactions.
- Navigate to the Parent account under Order Management -> Customers tab -> and Edit a parent account
- Under the Contacts tab, add a contact to the parent account with Standard or Admin access.
- Select the notification bell icon to adjust their email preference.

Outside Rep Sale Shipment Notifications
To manage the volume of communications, Outside Reps do not receive sale shipment emails by default. They can, however, opt to receive shipment emails for specific customers by selecting the notification bell icon next to their contact record on each customer for which they wish to receive notifications.
Triggering Email Send
Sale Shipments may be added in Shop Work or directly to the Sale in Order Management.
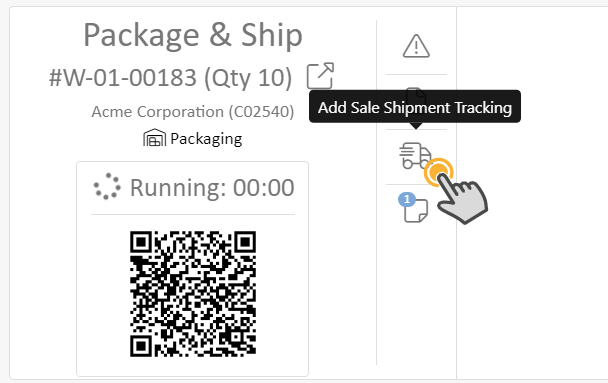
- Production employees may view and add sale shipments when running an operation by selecting the shipping truck icon and adding the tracking number.
- Navigate to Production -> Shop Work -> Open Work Order as Scanned button to open the Work can App.
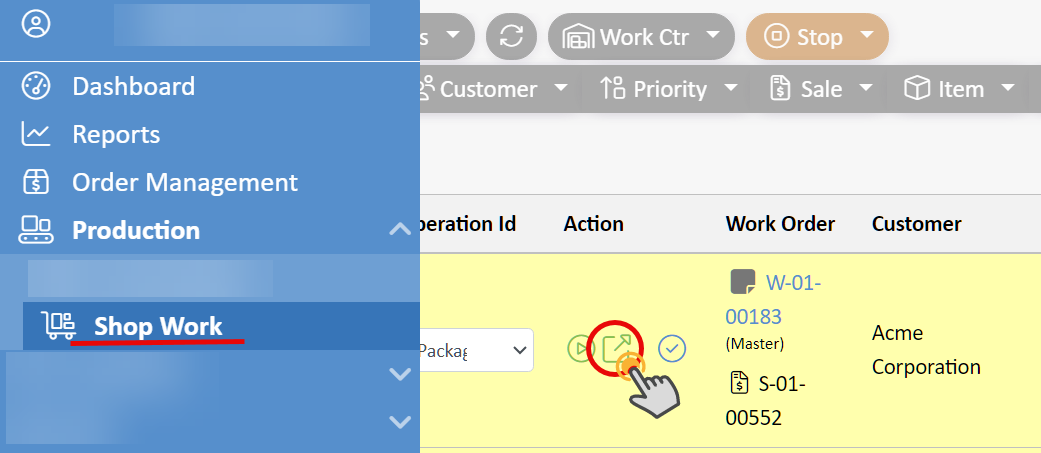
- While an operation is active, click the shipping truck icon button.
- Add the tracking number and relevant information. Click OK when finished.
Customer Service Agents may view and add sale shipments in Order Management.
- Navigate to Order Management -> Sales tab -> Edit Sale button for a sale.
- Under the Shipments tab, add a tracking number for the sale.
Setting Up the Sale Shipment Email System
Enabling the Sale Shipment Email Functionality
The Sale Shipment email functionality is switched off by default. To activate shipment tracking emails:
- In the left menu, navigate to System -> Site Settings.
- In the search bar search for Automatically Send Shipment Emails setting and enable it.

- Within this setting, a delay can be specified for when emails are sent after a sale shipment record is created. This delay helps consolidate notifications for an order into a single email and allows time for tracking information to update, minimizing customer confusion.
Setting The Default Email Content
Customize the email content through the following settings:
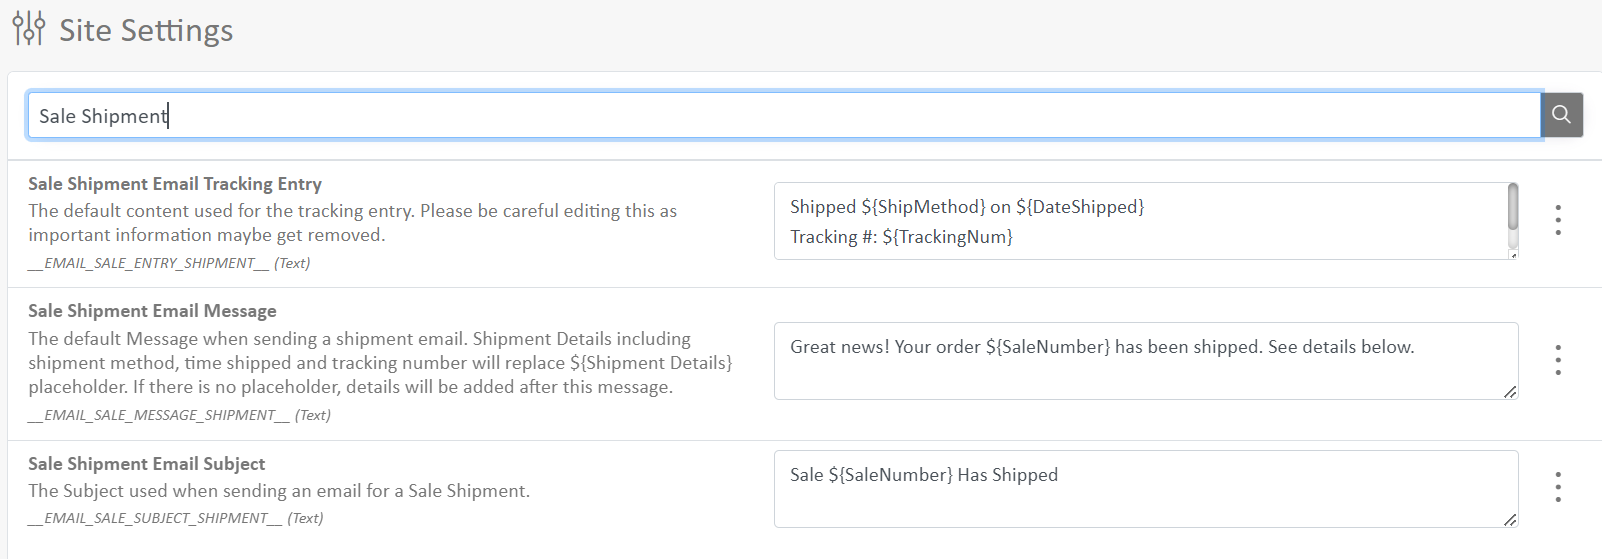
- Subject: Use the Sale Shipment Email Subject setting to define the email subject line, such as "Order ${SaleNumber} Shipped".
Order ${SaleNumber} Shipped
- Body: The Sale Shipment Email Message setting allows customization of the email body. A typical message includes a warm greeting, order details, and shipment information, concluded with the company's contact information for further assistance.
Great news! Your order ${SaleNumber} shipped.
${ShipmentDetails}
Best regards,${CompanyName}Order Management Team${CompanyPhone}
- Shipment Details: The
${ShipmentDetails}placeholder in the email body is replaced with specific shipment information for each item on the order, ensuring customers receive detailed and accurate tracking information.Shipped ${ShipMethod} on ${DateShipped}Tracking #: ${TrackingNum}${Notes}
Finding the Data Fields Available for Email Content
A certain set of data is available to customize the Default Email Content. To access the latest data available:
- Navigate to Files -> Documents -> Template Documents.
- From the⚡menu, select Order Email Fields.
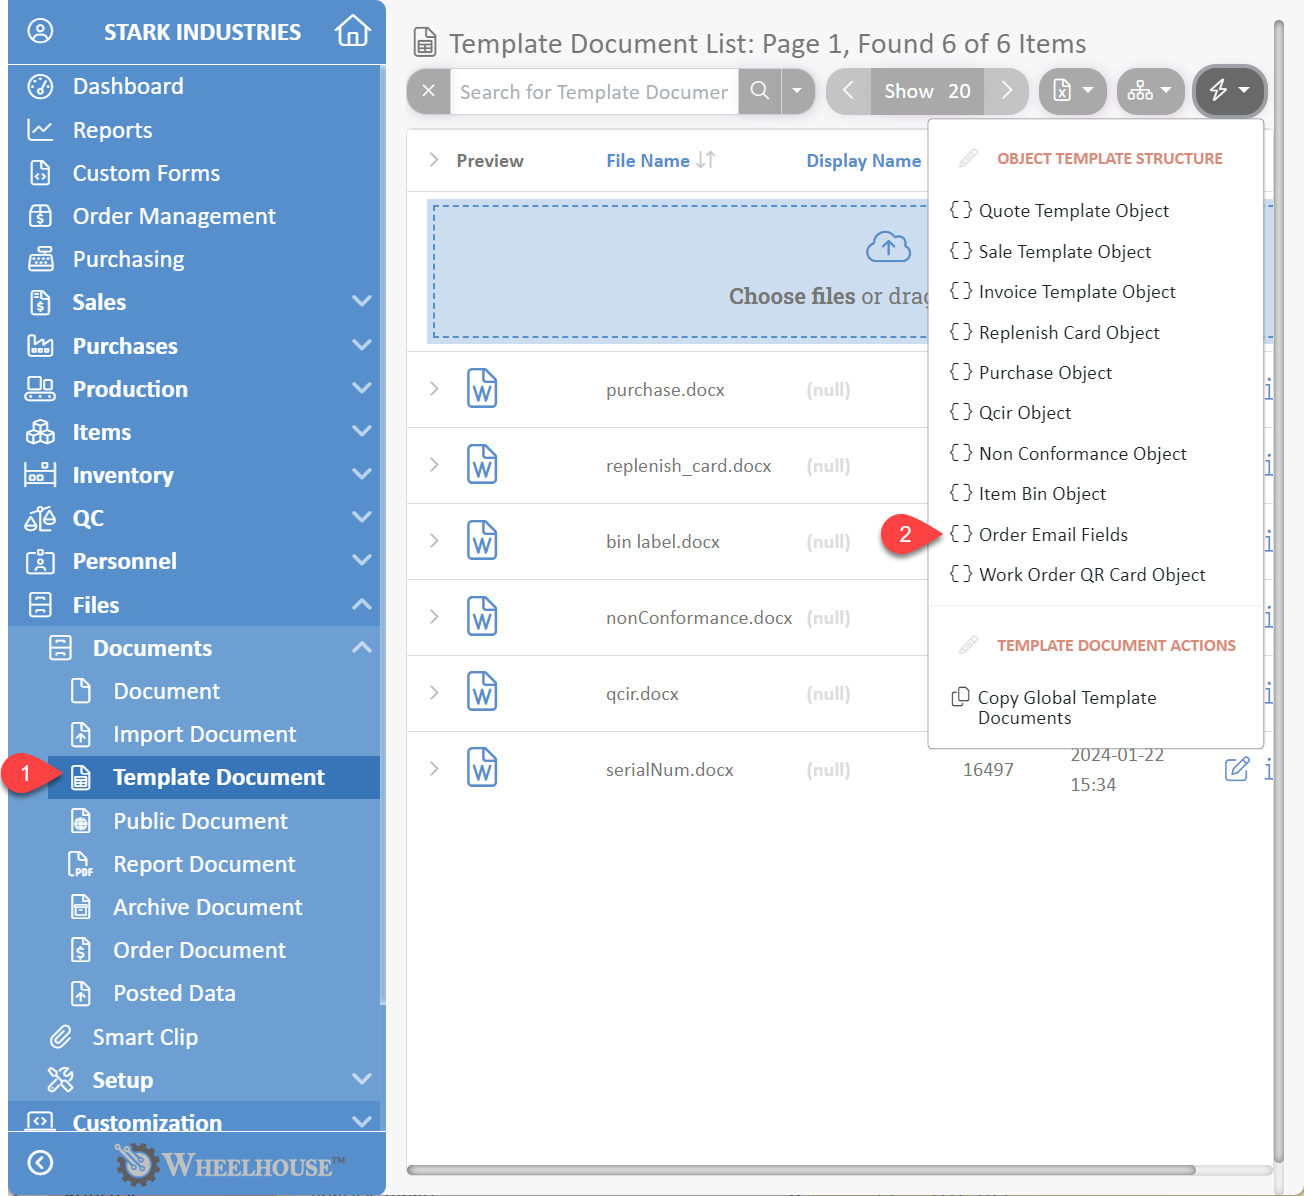
- Use any of the fields listed, wrapping them with a dollar sign and curly brackets like
${FieldName}. - The placeholder will be replaced by actual data when the email is sent.
How did we do?
Document Auto Number Format