Table of Contents
Setting Up Inventory Replenishment and Purchasing
Overview. This guide will walk you through the complete process of setting up an inventory replenishment and purchasing system in Wheelhouse. The system uses Kanban methodology to efficiently manage…
Overview
This guide will walk you through the complete process of setting up an inventory replenishment and purchasing system in Wheelhouse. The system uses Kanban methodology to efficiently manage inventory levels and automate the purchasing process.
Prerequisites
- Wheelhouse account with administrator access
Inventory Replenishment Methodologies
Before setting up your system, it's important to understand the different inventory tracking methods available in Wheelhouse. View the Wheelhouse tour of Purchasing and Receiving to understand the different inventory methods that are available.
Incremental Inventory Tracking
This method tracks individual units added to or removed from inventory, providing precise counts at all times.
Kanban Inventory Tracking
Kanban uses visual signals (cards) to trigger replenishment when inventory reaches a certain level. This method simplifies inventory management by focusing on maintaining an adequate supply rather than precise counting.
We suggest reading the Introduction to Kanban Inventory Management before following the setup steps outlined in this article.
Reorder Point Inventory Tracking
This method automatically triggers replenishment requests when inventory falls below a predetermined threshold.
When to Consider Reorder Point:
- Items with very high Minimum Order Quantities (MOQs) relative to usage
- Items with highly irregular, episodic demand
- Items where physical cards are impractical due to location or handling considerations
Calculate Minimum on Kanban (MOK)
Minimum on Kanban (MOK), sometimes called Minimum in Circulation, is the ideal total number of items that are planned to be in 'circulation', that is, at some step in the replenishment cycle. Calculating MOK is the method used to determine the ideal amount of inventory that will provide enough inventory to meet demand without overstocking, which reduces waste and improves cash flow.
The Minimum on Kanban is calculated using this formula:
MOK = Average Daily Usage * (Lead Time Days + Safety Stock Days + Order Frequency Days)
Each variable in this formula is critical to inventory performance. Let’s break them down with real-world context:
Components of the MOK Formula
Term | Meaning | Calculation | Example Values |
Average Daily Usage (ADU) | How many units of the item are used on a typical business day | Total Quantity Used ÷ Number of Business Days | 10 units/day |
Lead Time (LT) | The time (in business days) it takes from ordering to receiving the item. | Supplier Processing Time + Transit Time + Receiving Time | 7 days (vendor takes 4 days, 2 days for transit time, 1 day for receiving) |
Safety Stock (SS) | Extra stock held to protect against variability or unexpected demand. | (Maximum Daily Sales x Maximum Lead Time) - (Average Daily Sales x Average Lead Time) | 3 days |
Order Frequency (OF) | How often orders are placed (in business days) | Number of Business Days Between Orders | 5 days (ordering once per week) |
Example MOK Calculation
- Average Daily Usage (ADU): 10 units
Lead Time (LT): 7 business days - Safety Stock (SS): 3 business days
- Order Frequency (OF): 5 business days
MOK = 10 * (7 + 3 + 5) = 150 units
Organize Inventory: Standardize Container Quantities & Bin Locations
Physcial inventory should be organized prior to entering bin locations in Wheelhouse. The physical setup of bins and the standardization of quantities per bin helps production flow efficiently.
- Standardize Container Quantities
- Decide how many units will go into each bin for each Kanban item. This should match the card quantity and the total number of cards should be meet or exceed the MOK.
- e.g., If MOK is 150 units and you want 3 cards for the item, each card or bin should hold 50 units.
- Lay Out Bays, Shelves, and Positions
- Physically label racks or shelving units with Area, Bay, and Shelf markers.
- Plan the bay, shelf and position number from bottom to top and positions from left to right.
- Assign Bin Quantities for Kanban Cards
- If you're using physical Kanban cards, plan the number of bins and cards per item.
- Each card should be tied to a specific bin (e.g., Card A = Bin WH.10.401)
- Start small with 5–10 items. Focus on high-velocity items first, then expand once your process is working.
Set up Bin Locations
Once your physical inventory is organized, enter the matching digital structure in Wheelhouse.
Follow the guide below:
Print Replenishment Cards
To learn how to manage inventory locations, bins, and replenishment cards, see our full guide to the Inventory Manager:
Test Card Scanning and Receiving
Once your inventory areas, bins, replenishment cards, and purchasing systems are configured, test the end-to-end replenishment loop to ensure everything works smoothly before expanding across all inventory items. This test will confirm that scanning a replenishment card initiates the correct purchasing flow and that received items can be correctly restocked to their designated bins.
Scan Replenishment Card
Start by selecting a test item that is fully configured in your Inventory Manager, including:
- Linked item bin
- Area, Bay, Bin assignment
- Replenishment loop with cards in circulation
Add a replenishment card to the Buy Queue
- Navigate to "Purchasing" -> "Replenish Queue" -> "Buy" tab.
- Click the green Scan icon to enter the Kanban card number manually, or scan the Kanban card to add it to the buy queue.
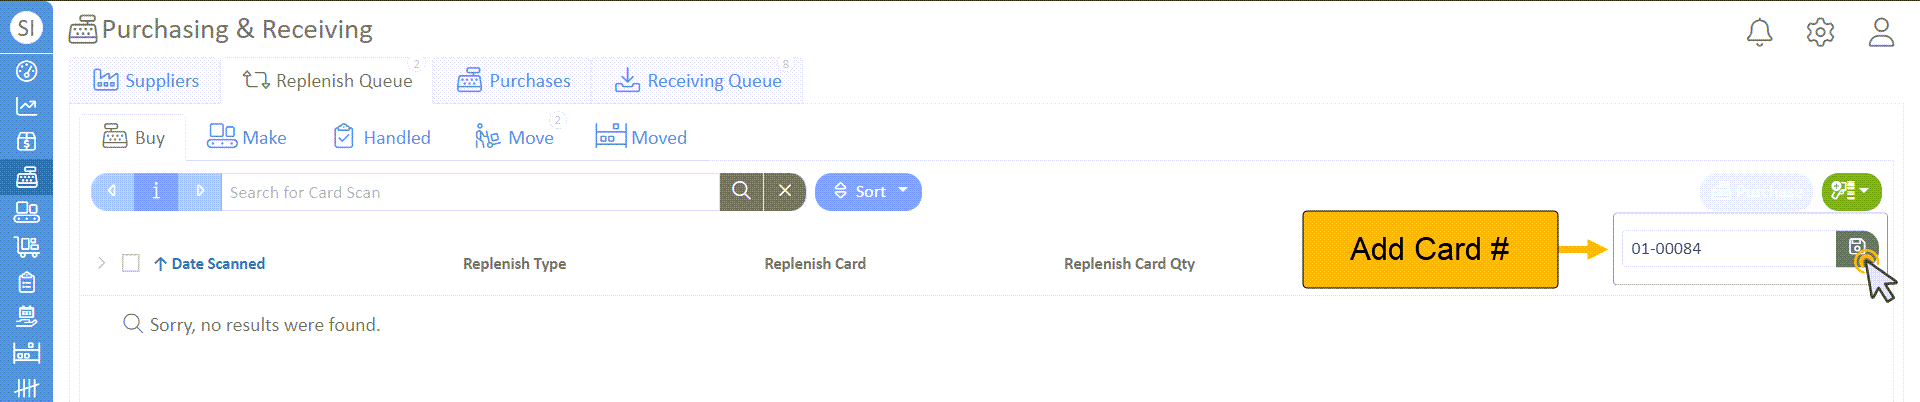
- To manually find your replenishment card number:
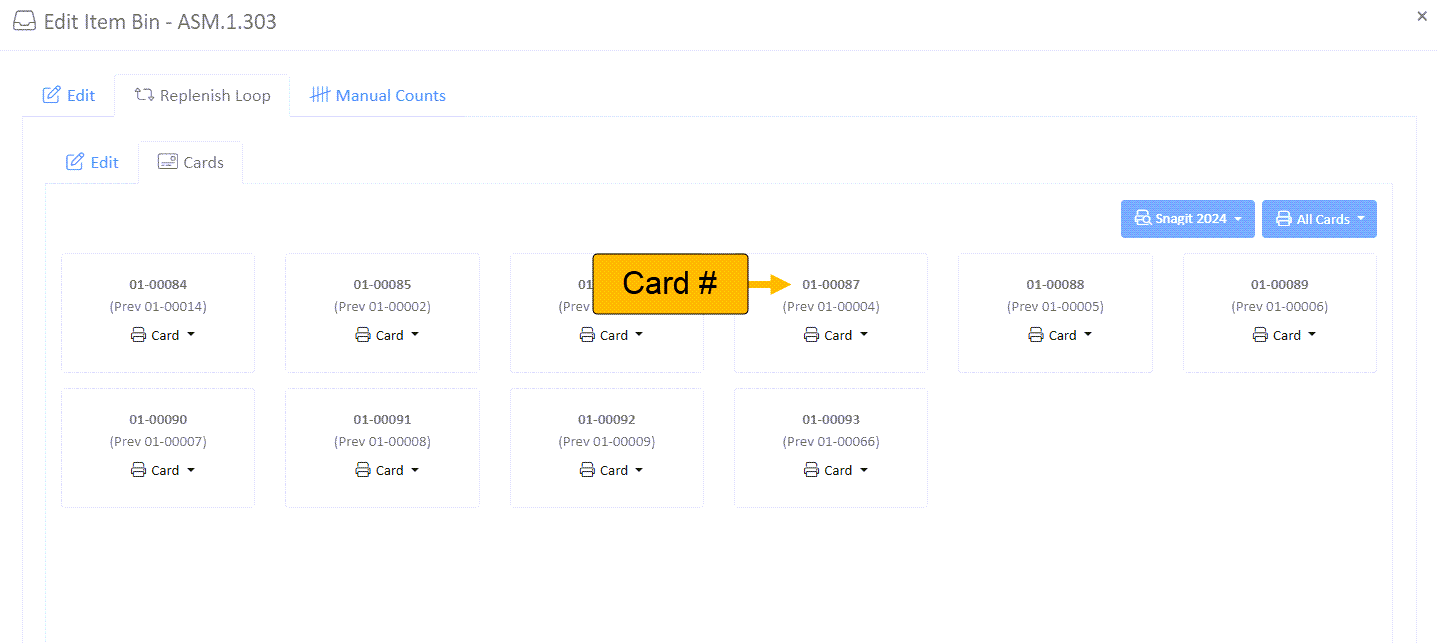
- Navigate to the Inventory Manager
- Select an Area, Bay, and edit a Bin.
- Navigate to the "Replenish Loop" tab -> "Cards" tab.
- Here, all replenishment card numbers are available.
- To manually find your replenishment card number:
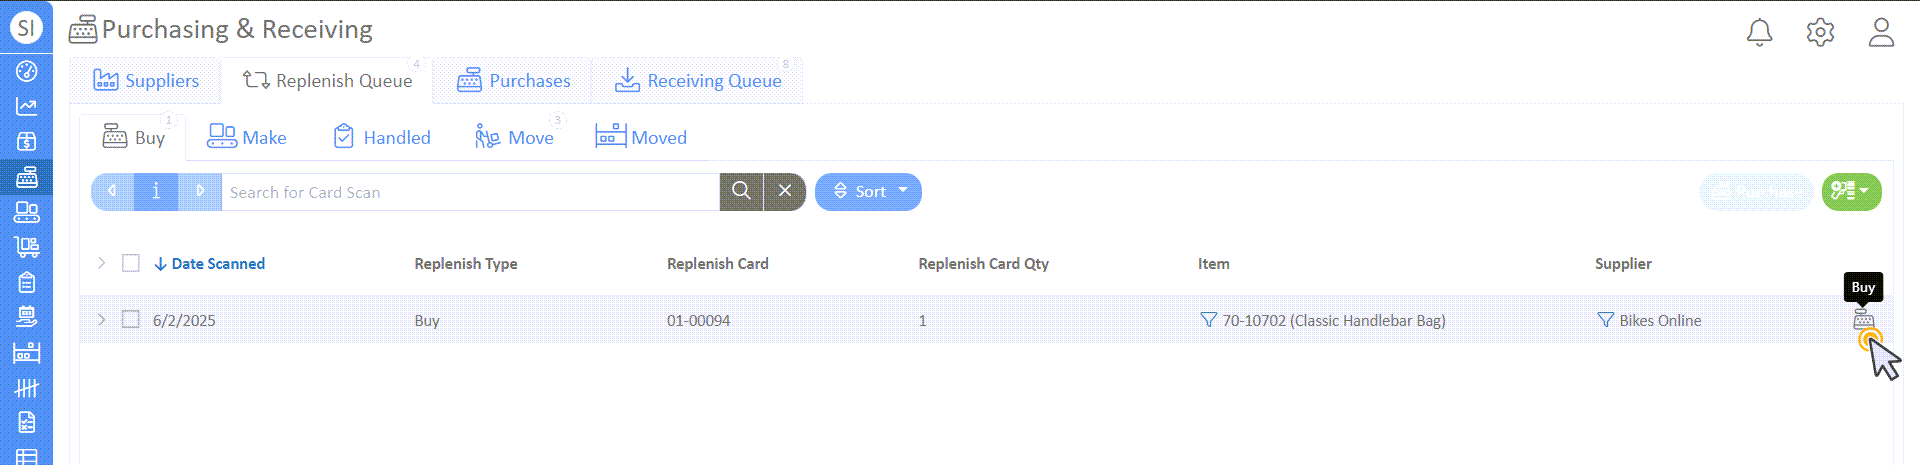
- You should now see the new replenishment card added to the queue. If a supplier has not been linked, you can do so now by selecting "Add to Supplier" under the Supplier column.

Purchasing
- To purchase, select the cashier icon on the far right of the record and select "New Purchase Order".
- Review the Open Purchase details. Here, the purchase information can be Printed/Emailed or exported as an excel file.
Set the Date Sent and Date Due
- Set the Date Sent by selecting the calendar icon with an arrow. For this test, we'll choose today's date and save.
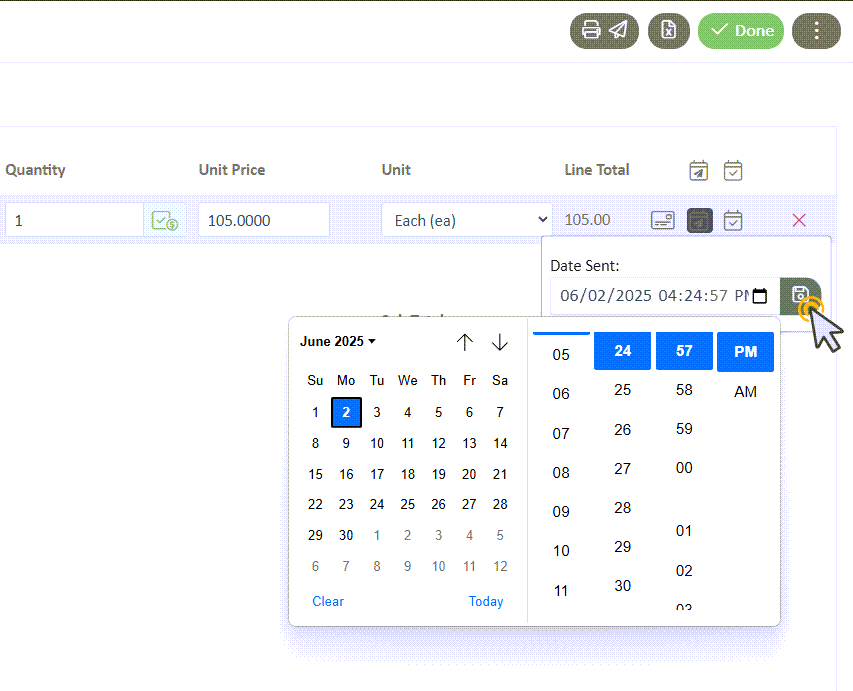
- The Due Date will set a default date depending on the item, and can be changed by selecting the calendar with a checkmark icon.
Receive the Item
- When receiving an item, select the arrow pointing to a bin icon.
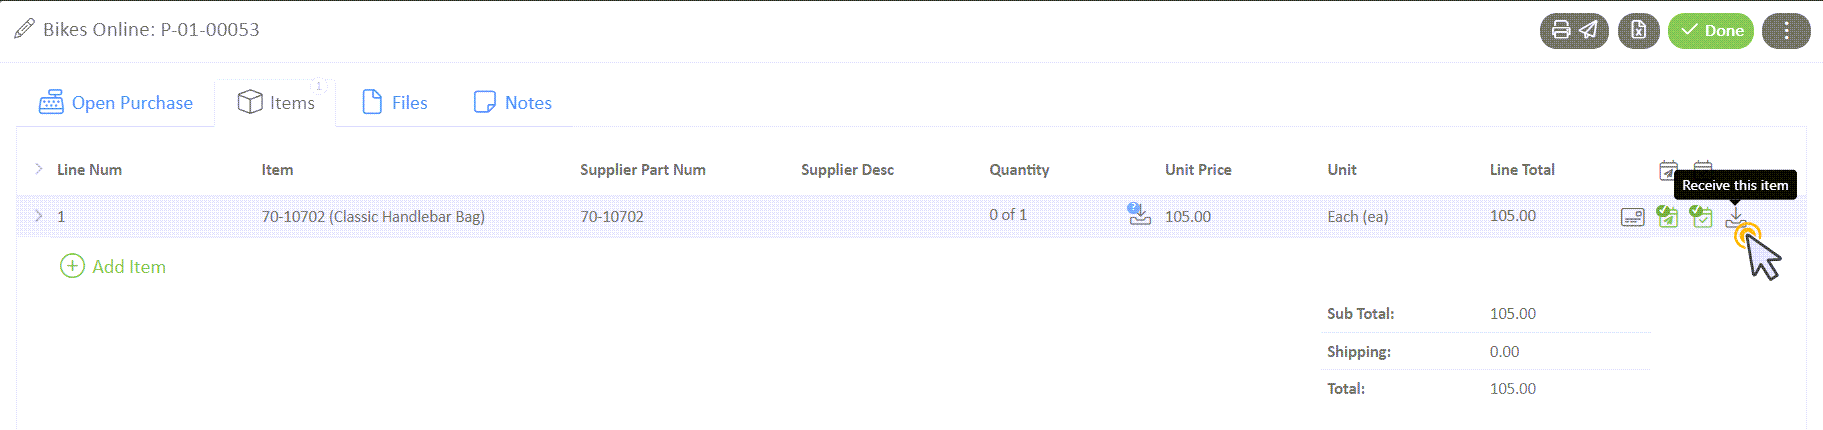
- Designate the Quantity Received, and save.
- A new icon will appear, designating that the item has been received but has not been stocked.
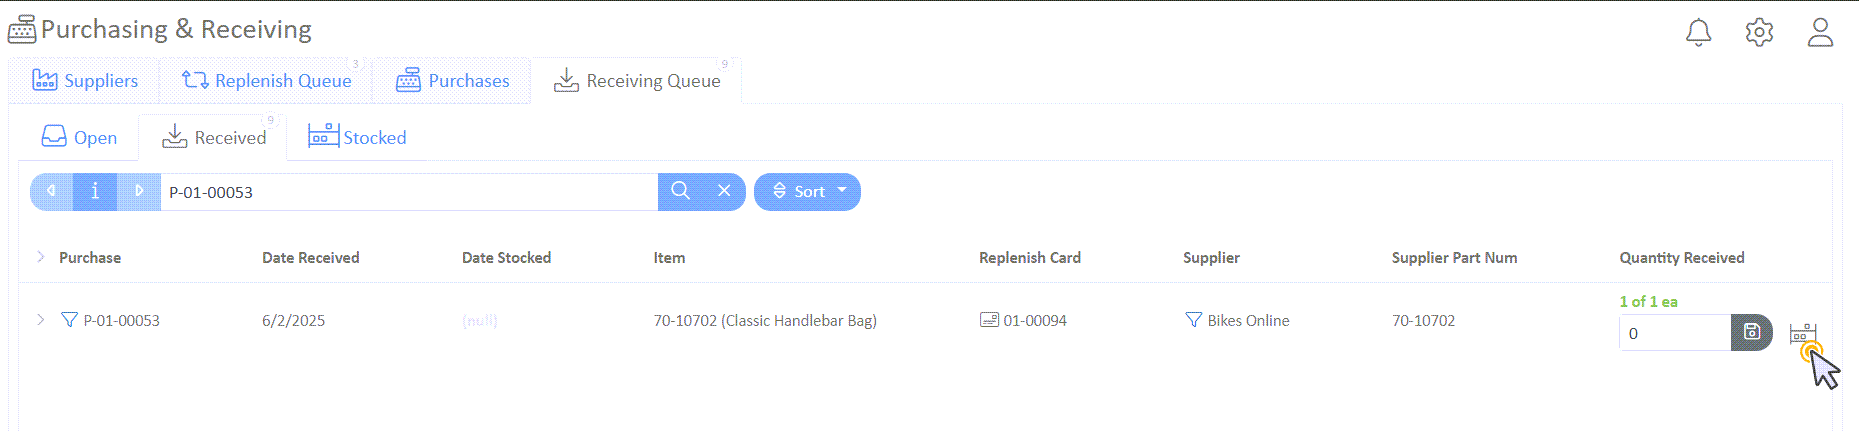
Stock the Item
- To stock the item, make a note of the Purchase Order number and select "Done" in the Open Purchase Order.
- Navigate to the "Receiving Queue" tab -> "Received" tab.
- Find your purchase order and ensure the full quantity is received.
- Select the stock icon to stock the item.
- In the slideout window, select "Stock w/ Cards" and "Has Been Stocked" to finish stocking.
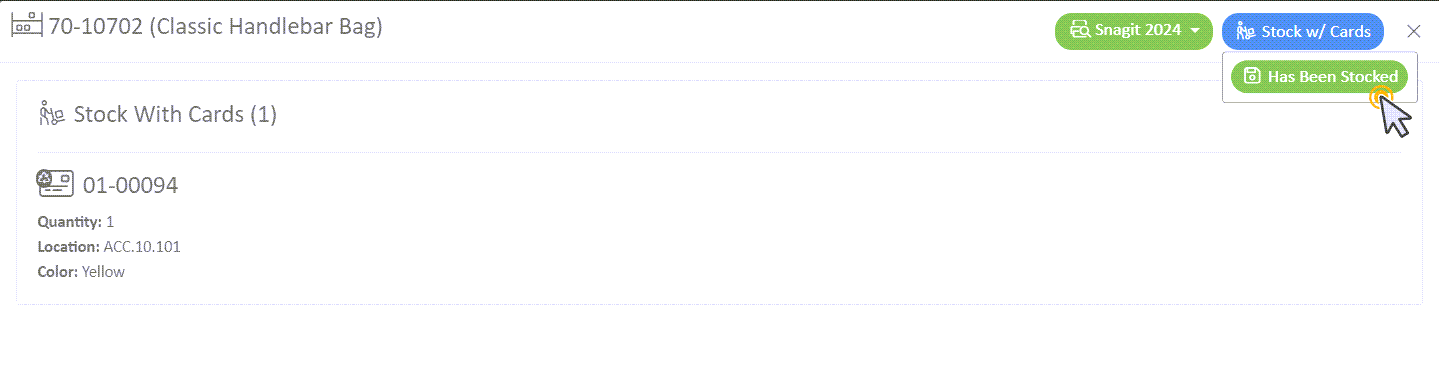
- Check that the item has been stocked under the "Stocked" tab.

This concludes our guide to setting up inventory replenishment and purchasing.
How did we do?
Introduction to Kanban Inventory Management
Inventory Hub Guide