QuickBooks Online Integration Setup and Troubleshooting
🧾 QuickBooks Online (QBO) Integration Setup. Wheelhouse integrates directly with QuickBooks Online (QBO) to streamline your accounting workflows by syncing customers, vendors, items, purchases, invoi…
🧾 QuickBooks Online (QBO) Integration Setup
Wheelhouse integrates directly with QuickBooks Online (QBO) to streamline your accounting workflows by syncing customers, vendors, items, purchases, invoices, and inventory adjustments. This guide walks you through how to connect your QBO account to Wheelhouse and verify the integration is working properly.
🔧 Step 1: Prepare Data
- For the Account Terms you use in QuickBooks, create the same Account Terms in Wheelhouse
- If you already have Customers or Suppliers in Wheelhouse, ensure the names match those in QBO.
🔧 Step 2: Wheelhouse QBO Settings
Review these key settings in Wheelhouse before switching on the integration.
- QuickBooks Debug Mode: Set to false for standard operation.
- QuickBooks Environment: Set to production in most situations.
- Line Item Settings: Set according to your company's policy.
🔧 Step 3: Connect to QuickBooks
- Sign in to QuickBooks Online with an Administrator Account
- Navigate to Gear → QuickBooks → QuickBooks Connect.
- Click the “Connect to QuickBooks” button.
- You’ll be redirected to Intuit’s secure login page. Sign in with your QuickBooks Online credentials and authorize Wheelhouse to connect.
- Once approved, you’ll be redirected back to Wheelhouse.
💡 Wheelhouse uses a secure integration token to maintain the connection with QBO — no need to reauthorize unless the token expires or is manually revoked.
✅ Step 4: Confirm the Connection
After completing the login and authorization, you’ll see a “Connected” message at the top of the QuickBooks Integration page in Wheelhouse. This confirms that your account is successfully linked.
You’re now ready to begin syncing data!
🔧 Step 5: Pull and Link Data from QBO
Pull terms, customers, suppliers, and items from QBO:
- Navigate to the Data Administration list for the specific type in Wheelhouse
- Run the "Import from QBO" action from the lightning menu in the upper right-hand corner of the screen.
- Review imported planned actions on the records and inspect for any issues.
- Rerun the import with the 'view actions' option deselected.
🔧 Step 6: Cleanup Data in Wheelhouse
You may need to adjust some of the imported records.
- Customers with Parent Organizations in QBO may not sync perfectly. You may need to change the name of the imported parent organization in Wheelhouse. Parent Organizations selected in Wheelhouse will be sent to QBO.
- The Credit Status of imported customers may need to be set to a default value. To accomplish this, you can use the "Bulk Update Customer Info" action from the lightning menu.
- Update Territories on Customers.
- Assign Account Numbers if needed.
🔄 Step 7: Enable Automatic Sync
The following data types are synced between Wheelhouse and QBO (see the overview for full details):
- Customers (edit in Wheelhouse; will update in QBO)
- Vendors/Suppliers (edit in Wheelhouse; will update in QBO)
- Items (Inventory & Non-Inventory)
- Payment Terms
- Purchase Orders
- Invoices (with payment status sync)
- Inventory Adjustments (via journal entries)
🛠 Troubleshooting & Tips
- Syncing Failed: If syncing fails, verify:
- You are still signed into QuickBooks Online.
- The item, customer, or vendor is properly linked in Wheelhouse.
- Token Expired: The token usually refreshes automatically, but occasionally, QBO needs a manual refresh. You can check your QBO connectivity by selecting the Gear menu and the QuickBooks Refresh option, as shown in the image below.

- Duplicate Document Number: When posting to QBO, an error is returned indicating a duplicate document number.
- Cause: QBO rejected the original document number because it was previously used in QBO. It is possible that someone accidentally created an invoice in QBO. If it has been voided, the invoice may not be immediately visible in QBO, but the number is still considered used. Also, any invoices automatically created by QBO for recurring billing transactions will increment from the last sequence number, which can cause overlap.
- Solution: When this happens, the best option is increment the invoice number manually, the invoice number, verify that it posts to QBO, and then update the invoice numbering sequence in Wheelhouse. The steps are listed below:
- In Order Management, go to the Invoices tab
- Open the Invoice that didn't post to QBO
- Manually change the Invoice Number, typically to the next number in the sequence.
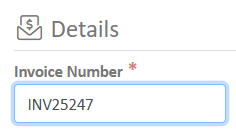
- Click Done, which will trigger the post to QBO.
- If the post to QBO fails again with the same error, please follow steps 2-4, increasing the number until the Invoice posts successfully.
- Go to Data Administration > Orders > Invoices > Open Invoice (Accounting Admin Role is required)
- From the Lightning menu, select "Increment Invoice Number"
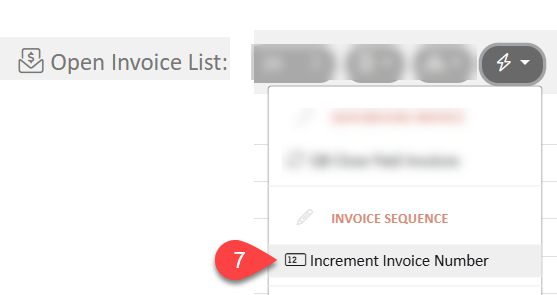
- In the dialog box, enter how many numbers should be skipped, and confirm the resulting number.

Need help? Reach out to support@wheelhousemfg.com.
How did we do?
QuickBooks Online (QBO) Integration Overview